
 USA
USA Australia
 Brazil
 China
China Croatia
 France
 Germany
 Italy
Italy Japan
Japan Latin America
 Netherlands
 Spain
Spain Turkey


Clinicians are familiar with the development of a white line at the junction between composite and tooth structure. Often, the resin looks excellent when initially placed, and then the white line appears after finishing.
So what is this white line?
It is mainly a mix of broken-down enamel and broken-down composite. These white lines are often the result of enamel cracks which trap polishing debris at the marginal area. Because enamel is very weak in tensile strength, these fractures in the enamel could be the result of several factors:
- Heat from polishing
- Polymerization shrinkage of the composite or the adhesive
- Prepping with burs
Also, because the composite is in a thinner layer at the margin, the restorative material may break down more easily from occlusal forces. The white line will eventually turn brown over time and will encourage caries to develop.
One way to avoid this phenomenon is to fill up the microgap with an unfilled penetrating sealer. The sealer will add longevity to the restoration and it will also reduce leakage and sensitivity.
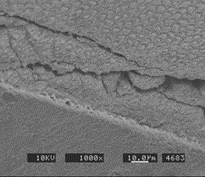
Fig 1. The SEM shows that the adhesive stayed bonded to the enamel interface, but the enamel cracked behind the bonding site. Enamel is very weak in tensile strength; hence polymerization shrinkage can sometimes cause enamel cracks to form.
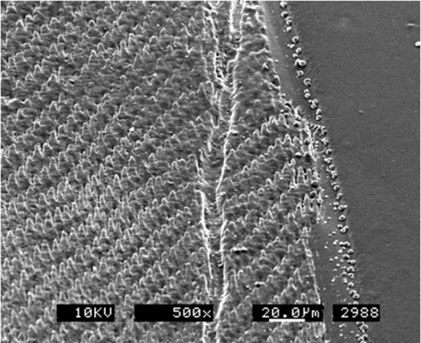
Fig 2. The microgap is filled with PermasealTM penetrating composite sealer.
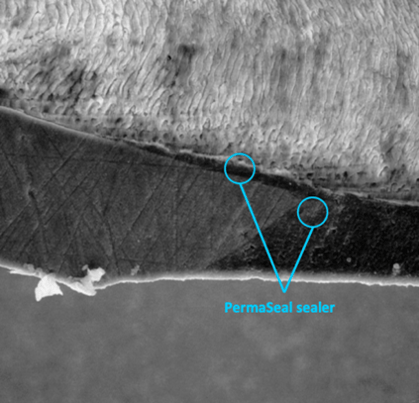
Fig 3: PermaSeal composite sealer has penetrated the microgaps between enamel and composite, sealing it completely.
A common misbelief is that the sealer wears off over time. It will eventually wear off on the buccal surface from toothbrush abrasion, chewing, and other functions. However, the marginal gap between the tooth and the restorative material is only 20 to 60 microns, which is less than the size of a human hair. If compared to a bristle of a toothbrush (200 to 300 microns), one can clearly understand that minimal surface is exposed and therefore this area is unlikely to wear off.
PermaSeal sealer procedure step-by-step:
After polishing and occlusal adjustment, etch all composite surfaces to be sealed and adjacent tooth surfaces for 20 seconds. Ultra-EtchTM 35% phosphoric acid is easy to apply thanks to its ideal viscosity.
- Etch, rinse and dry.
- Rub a thin layer of PermaSeal composite sealer into the surface of composite and adjacent enamel for 5 seconds.
- Gently air thin.
- Light cure for 20 seconds.
- Check occlusion
 Etch, rinse, and dry Apply PermaSeal Sealer Air dry Light cure Check occlusion
Note: Since polishing may open microgaps, we recommend sealing after polishing.
See how to use PermaSeal composite sealer in the video:
How does PermaSeal sealer compare with other composite sealers on the market?
Many sealers come in a bottle, which tends to waste material during application. PermaSeal composite sealer offers simple syringe delivery and the Black Micro™ FX™ tip gives precise and efficient placement. You only need a drop or two per application! Some brands of sealers are a filled resin. While filled resin may be stronger, it does not penetrate into the composite. PermaSeal composite sealer has the lowest viscosity when compared to other sealers on the market, plus an excellent wettability. It flows like water so that any microgap is completely filled.
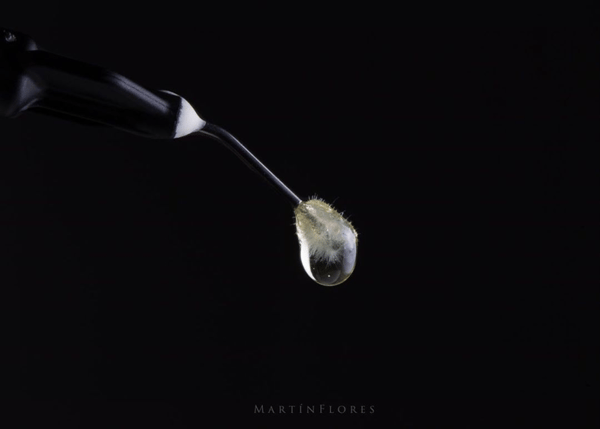
Fig 3. PermaSeal composite sealer is delivered with the Black Micro FX tip. This allows precise placement, the ability to rub the sealer into the surface for deep penetration, and minimal waste. Photo courtesy Dr. Martin Flores.
The use of a bonding agent is not recommended when using a composite sealer. Many bonding agents have a yellowish color which may change the esthetic aspect of your restoration. Some bonding agent may be filled as well.
Are there other clinical applications for PermaSeal composite sealer?
PermaSeal sealer provides a great finish to any type of composite restoration: direct, indirect, anterior, posterior, and provisional. It works perfectly with the Uveneer™ direct composite template technique too.
PermaSeal composite sealer can also be used for the final glaze-type finish of resin provisionals. It also bonds well to composite-type provisional restorations and can be used to revitalize old composite restorations.
Additional tips
Make sure to remove all marks of articulating paper on the tooth and the restoration. Do not forget to achieve a final cure through an oxygen inhibited gel barrier solution.
Why?
The last layer of composite never reaches full hardness when exposed to oxygen. This is why you can layer fillings; there’s an uncured layer on the top. This uncured layer also picks up stains and can dull quickly. Keep in mind that after final cure, it’s more difficult to add a new layer, so only do so at the very end.